As I was doing some research on a topic I was interested in I came accross a mock-up interview Dan Abramov made with Theo - T3 Tool.
The principle was simple, Dan was provided a backend sending message objects and he had to build a nice front-end from there.
In the video description, a link points to the interview options Dan had.
I thought it could be funny to try the option 2 that addresses junior to midlevel frontend developers.
So that’s pretty much it, now what about the Pokedex Problem?
Setting-up the environment
Just follow the “Setup” step of my introduction to reactJS

Once the installation finished you should have exactly the same boilerplate I have.
Remove all the code from App.js inside the highest div and let’s think a bit about the first part of the problem.
Part 1
We are asked to create a
So let’s do exactly that:
App.js
import React from "react"

const bulbasaur = {
  id: 1,
  name: "Bulbasaur",
  types: ["grass"],
  sprite: "https://pokemon.com/pictures/bulbasaur.png",
}

export default function App() {
  return (
    <div className="App">
      <PokemonRow pokemon={bulbasaur} />
    </div>
  )
}
Currently, we didn’t create the PokemonRow component so the linter would underlined it in red.
Then, we need to create a new tsx (typescript with jsx) file intitled PokemonRow. In order to add typescript to the project we have to run the following command:
npm install --save typescript @types/node @types/react @types/react-dom @types/jestin the project folder.
PokemonRow.tsx
import React from "react"

export default function PokemonRow() {
  return <div></div>
}
One great feature of typescript is interface. It helps providing types for the object we manipulate.
We could defined an interface IPokemon to characterize the contract a pokemon object will satisfy:
App.tsx
import React from "react"
import PokemonRow from "./PokemonRow"

export interface IPokemon {
  id: number
  name: string
  types: Array<string>
  sprite: string
}

const bulbasaur: IPokemon = {
  id: 1,
  name: "Bulbasaur",
  types: ["grass"],
  sprite: "https://pokemon.com/pictures/bulbasaur.png",
}

export default function App() {
  return (
    <div className="App">
      <PokemonRow pokemon={bulbasaur} />
    </div>
  )
}
The IPokemon interface requires a pokemon object to have some mandatory attributes. Notice we need to convert the App.js file to App.tsx file to use interface inside.
I also imported the PokemonRow component. Then, I typed the bulbasaur object.
Regarding the PokemonRow:
PokemonRow.tsx
import React from "react"
import { IPokemon } from "./App"

interface PokemonRowProps {
  pokemon: IPokemon
}

export default function PokemonRow(props: PokemonRowProps) {
  return (
    <div>
      {props.pokemon.id}
      {props.pokemon.name}
      {props.pokemon.types.map(type => (
        <li>{type}</li>
      ))}
      {props.pokemon.sprite}
    </div>
  )
}
I created a PokemonRowProps interface for the props.
Notice that the nomenclature is slightly different there: when I’m typing the form of the data I would name the interface ISomething while when I’m typing the props I would use SomethingComponentNameProps. I personnally think it’s a nice way to set apart data and props.
Since the types attribute is an array a map should be used to render each element as a list.
For now I just simple render the different attributes just to be sure I can display the data:
1Bulbasaur
grass
https://pokemon.com/pictures/bulbasaur.png
Now, let’s create a table with a row:
PokemonRow.tsx
import React from "react"

export default function PokemonRow(props) {
  return (
    <tbody>
      <tr>
        <td
          style={{
            textAlign: "center",
            minWidth: "200px",
            border: "1px solid black",
          }}
        >
          {props.pokemon.id}
        </td>
        <td
          style={{
            textAlign: "center",
            minWidth: "200px",
            border: "1px solid black",
          }}
        >
          {props.pokemon.name}
        </td>
        <td
          style={{
            textAlign: "center",
            minWidth: "200px",
            border: "1px solid black",
          }}
        >
          {props.pokemon.types.map(type => (
            <li>{type}</li>
          ))}
        </td>
        <td
          style={{
            textAlign: "center",
            minWidth: "200px",
            border: "1px solid black",
          }}
        >
          <img src={props.pokemon.sprite} alt={props.pokemon.name} />
        </td>
      </tr>
    </tbody>
  )
}
And that’s it for this part!
Part 2
We are expected there to create a new component that would use the PokedexRow we just built.
To do that we just need to map on an array of pokemons and use the previously made component:
PokemonTable.tsx
import React from "react"
import { IPokemon } from "./App"

import PokemonRow from "./PokemonRow"

interface PokemonTableProps {
  pokemons: IPokemon[]
}

export default function PokemonTable(props: PokemonTableProps) {
  return (
    <table style={{ border: "1px solid black" }}>
      <thead>
        <th style={{ border: "1px solid black" }}>Id</th>
        <th style={{ border: "1px solid black" }}>Name</th>
        <th style={{ border: "1px solid black" }}>Types</th>
        <th style={{ border: "1px solid black" }}>Sprite</th>
      </thead>
      {props.pokemons.map(pokemon => (
        <PokemonRow pokemon={pokemon} />
      ))}
    </table>
  )
}
Notice how the props are typed like an array of IPokemon.
This is the result:

Looking good!
Part 3
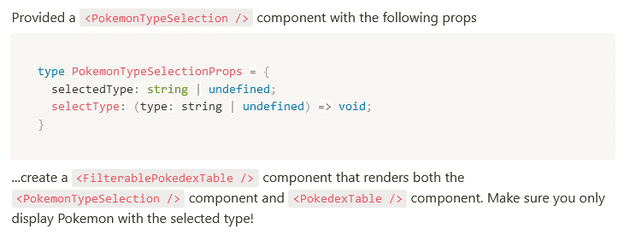
Let start by creating a FilterablePokedexTable that renders the PokemonTypeSelection and the PokedexTable (currently in the App.tsx):
FilterablePokedexTable.tsx
import React from "react"

import PokemonTable from "./PokemonTable"
import PokemonTypeSelection from "./PokemonTypeSelection"

export default function FilterablePokedexTable(props) {
  const [selectType, setSelectType] = React.useState(null)

  return (
    <>
      <PokemonTypeSelection
        selectedType={selectType}
        selectType={setSelectType}
        pokemons={props}
      />
      <PokemonTable
        pokemons={
          selectType
            ? props.pokemons.filter(pokemon =>
                pokemon.types.includes(selectType)
              )
            : props.pokemons
        }
      />
    </>
  )
}
As required, selectedType and selectType should be passed as props. They correspond respectively to the current selected pokemon type and the action of setting this type.
Notice the use of the UseState which is great to manipulate a state, check-out the beta documentation.
I also passed the pokemons from the props to do some manipulation inside the component.
Let’s see how PokemonTypeSelection is implemented:
PokemonTypeSelection.tsx
import React from "react"
import 'IPokemon' from './App'

type PokemonTypeSelectionProps {
  selectedType: string | undefined;
  selectType: (type: string | undefined) => void;
  pokemons:IPokemon[];
}

export default function PokemonTypeSelection(props: PokemonTypeSelectionProps) {
  return (
    <div>
      Current type selected: {selectedType ?? 'None'}
      <DisplayPokemonByType pokemons={props.pokemons} selectType={selectType} />
    </div>
  )

  function DisplayPokemonByType() {
    return (
      pokemons && (
        <div>
          <select
            value={selectedType}
            onChange={e => selectType(e.target.value)}
          >
            <option value="Chose" disabled hidden>
              Type
            </option>
            {props.pokemons
              .map(pokemon => (
                <option key={pokemon.id} value={pokemon.type}>
                  {pokemon.types}
                </option>
              ))}
          </select>
          <button onClick={() => selectType(null)}>Reset</button>
        </div>
      )
    )
  }
}
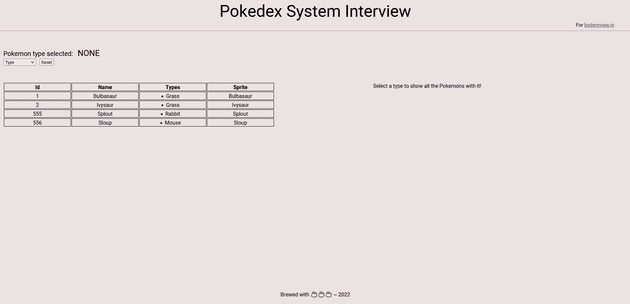
By default, if there is no type selected, the “Current type selected” is “None”.
The DisplayPokemonByType component renders the dropdown with the possible choices and also a button used to reset the selectType state.
Notice that the onChange attribute on the select is responsible to pass to the callback the target value that will update in the parent component FilterablePokedexTable.
As a consequence, the updated state is passed down to the PokemonTable where a simple test statement displays the right pokemon list:
<PokemonTable
  pokemons={
    selectType
      ? props.pokemons.filter(pokemon => pokemon.types.includes(selectType))
      : props.pokemons
  }
/>
Finally, useing the dropdown one can filter the pokemon depending on their type:
To conclude - The key takeaways
This end this mockup interview where the main challenge was to show knowledge of the state hook and how to retrieve from a child component a state in order to change the behavior in the parent or share it with other components.

Any remarks ?
Make a pull request or open an issue!
Don’t know how to do it ? Check out this very well explained tutorial


